Pulumi Workshop: Foundations to Advanced
Chapter 0 - Hello, AWS World!

Overview
In this chapter, we will develop a simple Pulumi program that creates a single EC2 instance with a basic web server running on it. Our goal is to become acquainted with the Pulumi CLI, understand the structure of a Pulumi program, and learn how to create multiple stacks and override default values.
Modern Infrastructure As Code with Pulumi
Pulumi is an open-source infrastructure-as-code tool for creating, deploying and managing cloud infrastructure. Pulumi works with traditional infrastructures like VMs, networks, and databases and modern architectures, including containers, Kubernetes clusters, and serverless functions. Pulumi supports dozens of public, private, and hybrid cloud service providers.
Pulumi is a multi-language infrastructure as Code tool using imperative languages to create a declarative infrastructure description.
You have a wide range of programming languages available, and you can use the one you and your team are the most comfortable with. Currently, (6/2023) Pulumi supports the following languages:
-
Node.js (JavaScript / TypeScript)
-
Python
-
Go
-
Java
-
.NET (C#, VB, F#)
-
YAML
Instructions
Step 1 - Configure the AWS CLI
We’re going to use the environment variables AWS_ACCESS_KEY_ID and AWS_SECRET_ACCESS_KEY to configure the AWS CLI.
Simply run the following commands to set them.
export AWS_ACCESS_KEY_ID=<your-access-key-id>
export AWS_SECRET_ACCESS_KEY=<your-secret-access-key>
To verify that the configuration is correct, run the following command.
aws sts get-caller-identity
Step 2 - Configure the Pulumi CLI
If you run Pulumi for the first time, you will be asked to log in. Follow the instructions on the screen to login. You may need to create an account first, don’t worry it is free.
To initialize a new Pulumi project, run pulumi new and select from all the available templates the aws-go.
pulumi new aws-go
You will be guided through a wizard to create a new Pulumi project. You can use the following values:
project name (00-hello-aws-world): 00-hello-aws-world
project description (A minimal Go Pulumi program):
Created project '00-hello-aws-world'

Please enter your desired stack name.
To create a stack in an organization, use the format <org-name>/<stack-name> (e.g. `acmecorp/dev`).
stack name (dev): dev
...
aws:region: The AWS region to deploy into (us-east-1): eu-central-1
The template aws-go will create a new Pulumi project with
the Pulumi AWS provider already installed. For detailed instructions,
refer to the Pulumi AWS Provider documentation.
Step 3 - Add a Compute Instance to the Pulumi program
Now, let’s begin adding resources to our Pulumi program, starting with a basic compute instance.
For a comprehensive list of available options, consult the Pulumi AWS provider documentation or utilize your Intellisense for code completion.
To gather more information about the available images and instance types, execute the following ‘aws’ commands.
aws ec2 describe-images --output json --region eu-central-1
aws ec2 describe-instance-types --filters "Name=current-generation,Values=true" --output json -region eu-central-1
Please use and Ubuntu 23.04 image and a t3.micro instance type.
This is the user data, you can use to install a simple webserver on the compute instance.
#cloud-config
package_update: true
packages:
  - python3
write_files:
  - path: /home/ubuntu/index.html
    content: |
      Hello, World from AWS!
runcmd:
  - cd /home/ubuntu
  - nohup python3 -m http.server 8080 &
If you got stuck, you can have a look at the solution.
Step 4 - Run Pulumi Up
Before you can run
pulumi up, you need to set the AWS credentialsAWS_ACCESS_KEY_IDandAWS_SECRET_ACCESS_KEYas environment variables.
pulumi up
This command will show you a preview of all the resources and asks you if you want to deploy them. You can run dedicated commands to see the preview or to deploy the resources.
pulumi preview
# or
pulumi up
Step 5 - Get the Public IP of the Compute Instance
To print information about the resources, you need to export the variables in your Pulumi program. In my case, I want to export the public IP of the compute instance.
ctx.Export("publicIp", server.PublicIp)
Run pulumi up again to see the public IP of the compute instance.
pulumi up

# omiied for brevity
Outputs:
  + publicIp: "194.182.187.163"
Execute the curl command to see if the webserver is running.
curl 194.182.187.163:8080
curl: (28) Failed to connect to 194.182.187.163 port 8080 after 75006 ms: Couldn't connect to server
Bummer, we can’t reach the webserver. Why? Because we didn’t open the port 80 in the firewall. Let’s fix this in the code!
Add a security group and security group rule to the Pulumi program, and attach the security group to the compute instance.
After applying the changes, you should be able to reach the webserver.
➜ curl 194.182.185.5:8080
Hello, World from AWS!
Step 6 - Create a new Stack
Now that we’re satisfied with our current stack, we should consider deploying our web server to a production environment. But what if we wish to deploy with varied outputs or in a different zone?
This is where the concept of ‘stacks’ becomes invaluable. Stacks allow us to manage multiple deployments of the same Pulumi program, each with its unique configurations. This flexibility means we can assign distinct configuration values to each stack and even establish default values for specific configurations.
To proceed, open the Pulumi.yaml file and insert the following configuration values.
config:
  httpPort: 8080
  aws:region: eu-central-1
  userData: |
    #cloud-config
    package_update: true
    packages:
      - python3
    write_files:
      - path: /home/ubuntu/index.html
        content: |
          Hello, World from AWS!
    runcmd:
      - cd /home/ubuntu
      - nohup python3 -m http.server 8080 &
These will serve as our default configuration values. To streamline our Pulumi program, remove the hardcoded values and replace them with the newly established configuration values.
To create a new stack, execute the following command.
pulumi stack init prod
This will create a new stack called prod. You can see all the available stacks with the following command.
pulumi stack ls
Create a new Pulumi.prod.yaml file and add the following configuration values.
config:
  httpPort: 8081
  aws:region: eu-west-3
  userData: |
    #cloud-config
    package_update: true
    packages:
      - python3
    write_files:
      - path: /home/ubuntu/index.html
        content: |
          Hello, World from AWS Prod!
    runcmd:
      - cd /home/ubuntu
      - nohup python3 -m http.server 8081 &
Run pulumi up again to deploy the new stack. After a brief moment, your new instance will be deployed. When you
execute
the curl command, you should receive a response from the newly deployed web server.
curl 138.124.210.178:8081
Hello, World from AWS Prod!
Verify that you the instances are running in different zones.
aws ec2 describe-instances --output table --region eu-central-1 --filters "Name=tag:Name,Values=simple-vm"
Step 7 - Pulumi Cloud Console
You might have observed a link to the Pulumi Cloud Console in the Pulumi output. The Pulumi Cloud Console is a web-based interface designed for managing your Pulumi projects and stacks. It provides a comprehensive view of resources, outputs, audit logs, and more.
Click on the provided link and sign in using your Pulumi account. Take a moment to explore and familiarize yourself with its features.
Step 8 - The new kid in town, Pulumi ESC!
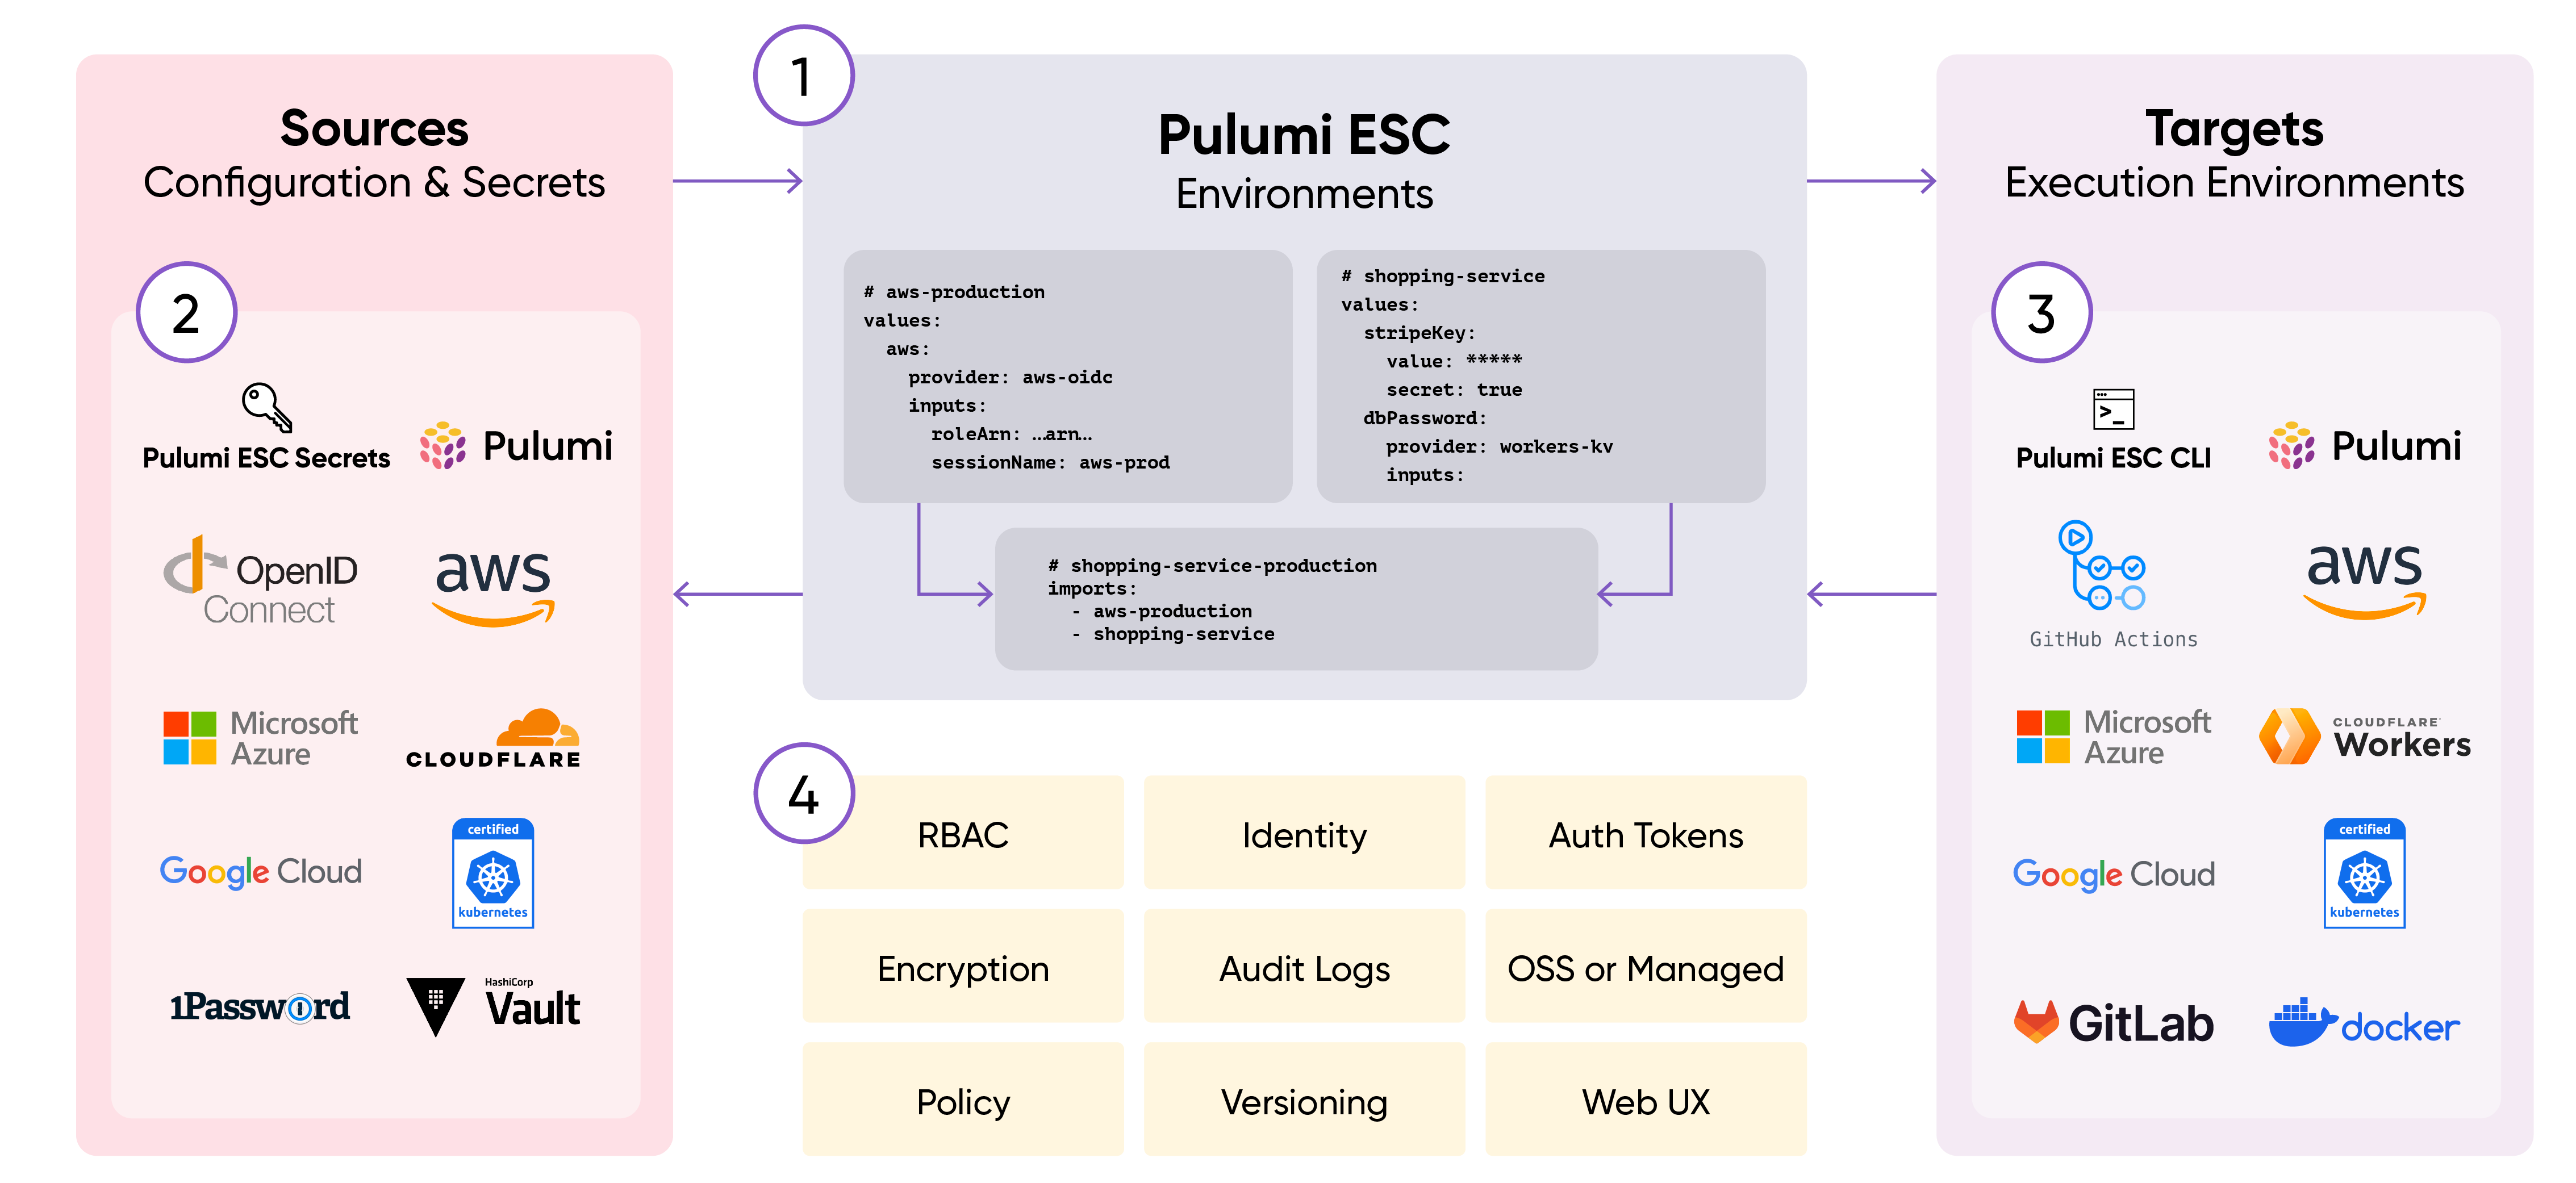
Pulumi ESC (Environments, Secrets, and Configuration) is a cutting-edge solution for managing secrets and configurations in modern cloud settings. It simplifies the complexities of configuration, ensuring a “secure by default” approach. Pulumi ESC introduces a new paradigm in configuration as code, allowing teams to consolidate secrets and configurations into a unified collection termed an ‘environment’. This can be utilized across various infrastructure and application services. While it seamlessly integrates with Pulumi IaC, Pulumi ESC also offers a standalone CLI and API for broader applications.
-
Pulumi ESC enables you to define environments, which contain collections of secrets and configuration. Each environment can be composed from multiple environments.
-
Pulumi ESC supports a variety of configuration and secrets sources, and it has an extensible plugin model that allows third-party sources.
-
Pulumi ESC has a rich API that allows for easy integration. Every value in an environment can be accessed from any target execution environment.
-
Every environment can be locked down with RBAC, versioned, and audited.
For more information, configuration options and example please visit the Pulumi ESC documentation.
Create new Pulumi ESC environment.
pulumi env init <your-org>/aws
And paste this content:
values:
  webserver:
    httpPort: 8080
    region: eu-central-1
    userData: |
      #cloud-config
      package_update: true
      packages:
      - python3
      write_files:
      - path: /home/ubuntu/index.html
        content: |
          Hello, World from AWS!
      runcmd:
      - cd /home/ubuntu
      - nohup python3 -m http.server ${webserver.httpPort} &
  pulumiConfig:
    httpPort: ${webserver.httpPort}
    aws:region: ${webserver.region}
    userData: ${webserver.userData}
Set up a development environment.
pulumi env init aws-dev
Paste only this content:
imports:
- aws
Finally, create a prod environment.
pulumi env init aws-prod
With this content:
imports:
- aws

values:
  webserver:
    httpPort: 8081
    region: eu-west-3
    userData: |
      #cloud-config
      package_update: true
      packages:
      - python3
      write_files:
      - path: /home/ubuntu/index.html
        content: |
          Hello, World from AWS Prod!
      runcmd:
      - cd /home/ubuntu
      - nohup python3 -m http.server ${webserver.httpPort} &
  pulumiConfig:
    httpPort: ${webserver.httpPort}
    aws:region: ${webserver.region}
    userData: ${webserver.userData}
You can now eliminate all the config fields in your Pulumi.*.yaml files and substitute them with the following:
For dev:
environment:
  imports:
  - aws-dev
For prod:
environment:
  imports:
  - aws-prod
Pulumi ESC offers an enhanced method for managing configuration values, making it easier to share them with your team or across different stacks. While the earlier config approach remains supported, you also have the flexibility to combine both methods.
Step 9 - Destroy the stack
To destroy the stack, run the following command.
pulumi destroy
pulumi stack rm <stack-name>
And confirm the destruction with yes.
To switch between stacks, you can use the following command.
pulumi stack select <stack-name>
Stretch Goals
- Can you create a new stack with a different instance type?
- Can you enable ssh access to the compute instance with your local ssh key?